Last Updated on January 1, 2025 by Andrew Shih
How to start a blog
Are you looking to start a blog?
If you are just looking for quick steps on how to create a blog, you can find many articles on the internet. However, this article is for you if you want to learn how to start a blog on WordPress by taking the proper steps and becoming a successful blogger.
What is unique about this “how to start a blog” guide?
You will find money-saving tips, blogging tips, and costly mistakes to avoid that will help you achieve the success that you most likely won’t find elsewhere. Make sure you bookmark this page so you can come back easily and share this site.
We will cover from understanding the current landscape of blogging and steps to set up a successful blog, all the way to maintaining your blog. Let’s get started.
Disclaimer: Some of the links below are affiliate links, which means that if you choose to register or make a purchase, we may earn a commission. This commission comes at no additional cost to you. Please review the full affiliate disclaimer.
1. Should I start blogging
Starting a blog is like planting; It will require plenty of tender, loving, and care before it will bear fruit of your hard work. It will also require ongoing maintenance to keep it healthy.
Why blogging?
Most bloggers look into blogging to make extra money.
Unlike a day job that only offers one income stream and the possibility of getting layoff, blogging can offer multiple passive income streams, and you are the boss. Your blog can provide an additional income source even when you get layoff or retire. It is an asset you can hand down to your next generation, too; try that with your job.
Most bloggers started blogging by sharing their hobby, passion, experience, knowledge, expertise, or challenge they are going through. The purpose is to generate traffic by connecting with the right audience, building trust, and generating a return from this investment.
Can I start a blog for free?
The short answer is yes, but there are limitations. If you are unsure about blogging and just want to test the water, it makes sense to check out these free sites for blogging before devoting time and resources.
However, a few common drawbacks with these free blogging sites include a lack of full control, functional limitations, and unwanted ads from the free hosting site.
Is Blogging worth it?
According to Internet Live Stats, there are over 1.7 billion websites on the internet. No doubt there will be competition, and you will find people who have done what you want to do. Blogging will only get more competitive. It will get harder and take longer to rank on the first page of Google.
Despite all the challenges, I would say blogging is still worth it. It is never too late to start a blog, Blogging is an excellent passive income strategy, and it is worthwhile to pursue. If you are determined, willing to put in the effort, commit to learning, and persistent, you can still create a successful blog.
BLOG TIP: Think about creating fantastic content first before you think about making money blogging.
2. Come up with ideas on what to blog about
Once you determine that you are committed to blogging, you will need to brainstorm ideas on what to blog about. Blogging is a long journey, so ideally, you want to choose a niche that meets the following criteria:
- You have a strong passion for this niche
- The niche has enough monthly search volume
- There is room to expand to related topics as you grow.
- The niche has pockets of low competition and profitable opportunities

While you don’t have to be an expert in the niche, it is certainly helpful if you can demonstrate expertise and are knowledgeable in this area to build trust quickly.
Learning as you go is fine; you can share your learning experience and journey. People love stories, and stories work really well in helping the audience who share similar experiences make an emotional connection with you.
Most people look into blogging as a way of making money. After all, “How to start a blog and make money” is a popular search. If making money blogging is an important factor in deciding your niche, there is a chart I created from the Google Adsense calculator to help you out.
Most bloggers make money from affiliate companies and Google Adsense within your niche category, so it also makes sense to get a rough idea of your earning potential before diving in.
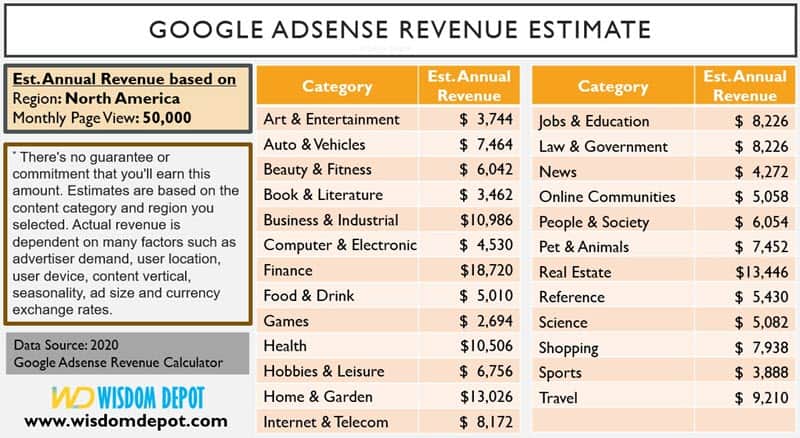
If you want to minimize the maintenance effort, you want to pick an evergreen niche.
Evergreen niches rarely change, such as gardening, animal, fitness, food, etc. Nonevergreen niches are such exam/certification and trendy subjects such as fashion and C.
However, don’t be deterred because the niche is not evergreen. If you have expertise and passion for the niche, you can still make a profit even if it is a small niche, such as my PMP Certification blog.
There are also plenty of tools if you need help coming up with blog ideas and finding the search volume. If you have multiple blogging ideas, focus on one first, and keep other ideas as backups.
BLOG TIP: Don’t pick a niche because it seems highly profitable. You need to have passion, knowledge, and eagerness to learn about the niche; otherwise, you will not be a successful blogger in the niche.
3. Research your niche
Before you spend time and money on creating a blog, it will be worthwhile to take a moment to find out what you are up against and learn about your target audience.
Research your competitors
You should discover the existing players in your niche by googling the keyword. There will always be some level of competition; your idea will hardly be new. If you didn’t find any competition, it probably means one of two things: you are not trying hard enough, or two, it’s a bad niche.
Be warned that you will likely find websites that do exactly what you want to achieve.
You may feel disappointed and ask yourself if you should still continue your blog journey. Yes, I knew this feeling when I got started my blogs about project management and this blog. It did not stop me, and it did not stop you from finding this blog.
When this happens, ask yourself the following two questions:
- Can I focus on a smaller niche first?
- What can you offer that’s better or different?
Engage your target audience
To provide value to your target audience, you need to understand the challenges they are dealing with. The easiest way is to leverage the discussions on Quora and Reddit. Keep a record of the problems discussed and the solutions mentioned by others.
You can also ask questions to better understand the problem or participate in discussions and offer solutions. The better you understand your target audience, the easier it will be for you to craft messages that resonate with them.
4. Choose a domain name for your blog
Picking a domain name is a crucial step. It will be a massive hassle if you ever have to change the domain name and rebuild the brand. You should look at the availability of both the domain name and social media accounts.
Brainstorm domain names and check availability
While it can seem difficult to come up with a good domain name that is still available, it can still be done.
Good domain names are still available
Coming up with a good domain name will take a bit of time. With nearly 2 billion websites already out there, you may feel all the good domain names have been taken. However, let me show you an encouraging stat.
According to the Merrian-Webster dictionary, there are about 1 million English words. If you combine two English words, there are about 1 trillion combinations. With 2 billion existing websites, it merely represents 0.2 percent of the 2-word combination. Not to mention the near-infinite 3-word combinations or making up your own words. So, you can do it.
Coming up with a good domain name
A good domain name should be easy to pronounce and able to connect with your audience. Having the niche keyword in the domain name will help, but it’s certainly not a must-have. Don’t believe me? Just look at Amazon.
If you need help coming up with domain names, try the following:
- Write out keywords that describe your niche and service.
- Checkout the dictionary, thesaurus, and Wikipedia.
- Try the domain name generators.
Some of you may want to use your name as the domain name and build your brand.
While you can certainly build a strong personal brand and make money from your blog site, selling your domain or having someone else take over as the exit strategy will be much more challenging. Be aware of this downside if you want to use your name as the domain name.
AVOID: Make sure your name does not have unexpected meanings. Avoid this mistake unless this is how you want to gain publicity. Need examples? Try: speedofart.com, penisland.com, expertsexchange.com, whorepresents.com.
AVOID: Don’t use words in your domain name that has been trademarked. While this may not be comprehensive, you can quickly check using USPTO or 3rd party providers such as Trademarkia to search for free. And, of course, search in Google and see what comes up.
Once you find your ideal domain that is available and not subject to intellectual property issues, you should check if the Social Media platforms are available for this ideal domain name.
Check Social Media availability
To strengthen your brand, most likely, you will want to secure the name on social media platforms as well. Tools such as NameCheckr can check multiple social media platforms for free. Even if you do not have time to set up the profile, you can open an account and just reserve the name for the future.
5. Choosing a blogging platform
Once you have done your market research and a domain name, it’s time to choose a blogging platform.
Blogging platforms can be classified into two types: hosted and self-hosted.
Hosted platforms have web builders that help users create blogs and websites easily within minutes. They offer features such as templates, drag-and-drop editors, and website hosting.
Some of the most popular hosted blogging platforms are Wix and Strikingly, with free hosting plans available. The hosting company will take care of all the heavy lifting, such as upgrading, security, and backup of your website. The main downsides are that you are tied to the platform and less flexible.
Self-hosted blogging platforms offer the most flexibility because you can choose any web hosting company to run your website. According to W3Techs, WordPress is the most popular content management system, with over 60% of the market share for the self-hosted blogging platform.
The key strength is the giant community behind WordPress, with tons of themes and plugins that offer enormous flexibility. The downside is that it can be overwhelming with so many choices, and it can take a bit of a learning curve.
Since WordPress is the most popular choice and Wisdom Depot also runs on WordPress, we will cover how to start a blog on WordPress for the remainder of the steps.
6. Host your website (with big savings)
Bluehost is a good website hosting provider for beginners, which offers affordable pricing, uptime, security, and support. Bluehost is also the recommended hosting provider by WordPress. You can learn more about Bluehost here.
If you are ready to use Bluehost, I have several money-saving tips to get you the best deal with Bluehost.
MONEY TIP #1: Get started with a Shared Hosting plan. A shared hosting plan starts at $2.95/month vs. $79.99/month for a dedicated hosting plan. There is no need to spend extra money when you do not have traffic and content. You can always upgrade later.
If you have a domain name in mind, enter the domain here.
Bluehost will check the domain availability. If it is available, you will be able to register the domain.
MONEY TIP #2: If you register your domain through Bluehost, you can save the domain name registration fee – another $10 saving.

MONEY TIP #3: Start with a Basic plan to save money. One website with 50GB is enough for most bloggers. There is no need to overpay for extras you are not going to use.
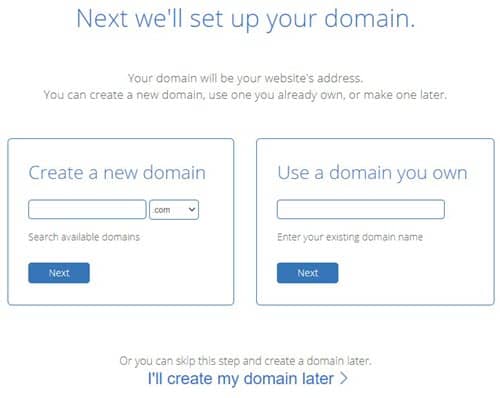
Depending on whether you already have the domain name in mind, you can either register the domain name with Bluehost for free or skip this step. If you already purchased the domain name elsewhere, you can enter the field “use a domain you own.”

MONEY TIP #4: If your budget allows, no matter which plans you choose, go for the longest plan available to get the introductory rate saving. The renewal rate will be higher. Currently, the 36-month plan is the longest allowed on Bluehost.
MONEY TIP #5: Uncheck the package extras. There are free WordPress plugins that you can use to backup your site and assist you with SEO. Refer to the Plugin Installation in Step #8 below.
7. Install WordPress with One-Click Install
The easiest way to install WordPress is to use the One-Click install from the Marketplace. Ok, it does take more than one click to install, but it’s easy.
Within Marketplace, scroll down to the Feature Products, and you will find “One-Click Installs.”
One-Click Installs supports several platforms. We will choose to install WordPress.

You will be prompted with the screen to give a name and a brief description of your new site. You also have the optional advanced setting for setting up the default administrator account.
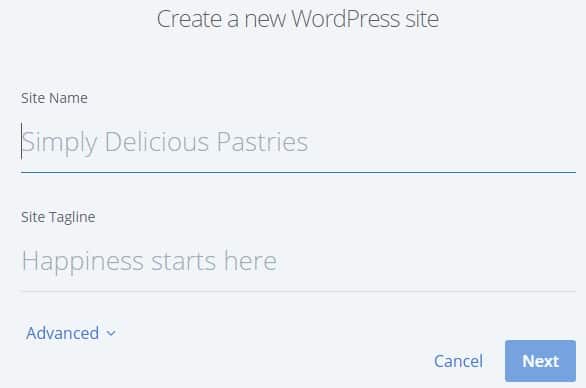
Finally, pick the domain name you want to install WordPress, click Next, and it will start the WordPress installation.

Next, you will see the following congratulations screen for the successful installation of WordPress. You will need to store your user, password, website, and admin URL information.

Now, you are ready to start configuring your website!
Use the information provided on the screen, and type in the admin URL (with https://www….com/wp-admin) on the browser. It will bring you to the login screen, where you can enter the login ID and password given to you.
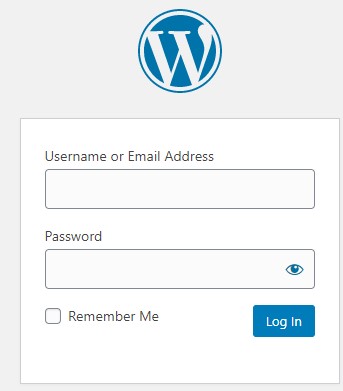
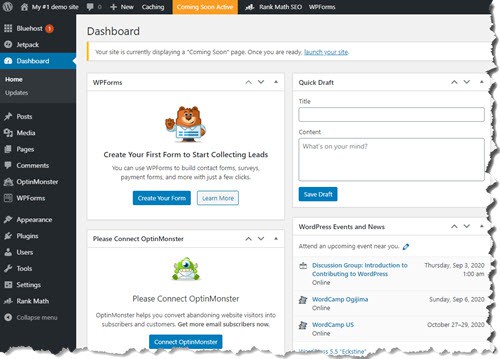
Now you are in your WordPress website as the administrator. This is where you can configure your website.
8. Pick and install a WordPress theme
The theme will be the face of your blog. You want a theme that conveys your brand, offers a seamless user experience, and plenty of customization functionality to meet your need.
Picking an ideal WordPress theme can be an exciting process, but it can also take quite a bit of time to find the perfect one. There are thousands of free WordPress themes available; some are better suited for blogging, photography, restaurant, sports, etc.
The good news is you can easily preview how your site will look with the theme, activate, or switch to another theme quickly within a few clicks. So you are never locked down to a theme.
The main downsides of free themes are their limited functionality and customizability. You may find yourself spending considerable time trying out different free themes and trying to work around the limitations. The lack of functionality is why most people opt for a premium theme.
A premium theme generally costs between $50 to $60. It is a worthy investment to make your blog site look stunning and save yourself time.
In case you are wondering, this site uses a premium Soledad theme, and I have used the Newspaper premium theme as well. Both are good themes to use.
Let’s not get hung up on picking the ideal theme. I would suggest just picking a reasonable-looking free theme first, finishing installing plugins, creating those crucial pages and a few blog posts, follow the steps below.
Once you have more of these contents in place, it will be easier for you to decide which theme is better.
To pick a theme, simply go to Appearance > Theme. You can add more themes, customize the theme, change the active theme, or purchase the premium theme.

BLOG TIP: If you want to hire a webmaster to do the work for you, the webmaster can help you pick on a premium theme. I would suggest YOU purchase the theme yourself, so you are the owner of the license, not your webmaster. You can give the license key to the webmaster to complete the installation.
9. Install free WordPress plugins
There are thousands of WordPress plugins available, which is what WordPress is so powerful and yet daunting. You can most likely find a list of plugins to meet your need. It can take quite a bit of time to sift through all the plugins, so here is the list of my recommended plugins.

- Must-Have Plugins for all sites:
- Rank Math SEO: Must have for SEO optimization. Another popular SEO plugin is Yost SEO.
- Schema & Structured Data For WP: Structure your data that helps the search engine understand your content and improve SEO ranking.
- Advanced noCaptcha & invisible Captcha: Are you a bot? This free plugin prevents bots from trying to hack your site and deters much of the unwanted spam.
- AddToAny Share Buttons: The plugin adds appealing Social Share buttons to your Website so your audience can share your post. Social sharing is a signal the content is useful and will help rank your blog poster better.
- W3 Total Cache: There are quite a few cache plugins available that optimize your site, such as minify JavaScripts, leverage browser caching, and much more. W3 Total Cache is the plugin that seems to work better for my site, but you can also use GTMetrix or Google Speed Test and try which optimization plugin works better for your site.
- UpdraftPlus – Backup/Restore: Backup your site with just one click. Restore is easy too, simply pick what you want to restore, and that’s it. Backup your site especially when you make major changes or updates. It will help you avoid disasters (p.s. it did save my website).
- Highly Recommended Plugins
- Smush – compress images to improve page load time and site performance.
- PrettyLink – exactly as its name states, the plugin makes the link prettier. Affiliate links can look long and ugly; you can make the link shorter and recognizable and track the links. The premium version has report functionality.
- LuckyWP Table of Contents – If you write blogs that are typically long and thorough, with more than 1000 words, it may be useful to provide a table of contents so the user can easily skip to the relevant section and improve user experience.
- MC4WP: Mailchimp for WordPress: Mailchimp allows you to collect the first 1000 emails for free. If you decide to use MailChimp, you can use MC4WP to integrate with your MailChimp account and collect user names and emails.
- WPForms: A simple contact form to set up easily and get started. Once a user completes the form, you will get it in your email. However, if you want to collect email and integrate it with marketing platforms such as MailChimp, you will need to upgrade to pro.
- wpDiscuz: My favorite plugin for comments. The UI is modern, has plenty of configurable options, is easy to use, social sharing, and is much more engaging with your audience. It’s much better than the classic WordPress comment.
- WP Last Modified Info: By default, WordPress only shows the publish date, even if you made updates to the post. This plugin will show the last update date, so the article doesn’t seem old.
- WP User Avatar: Need a simple way to show a profile picture for yourself or your subscribers? This plugin allows you and your subscriber to bypass the hassle of creating an account and uploading the profile picture to Gravatar. You and your subscriber will be able to upload a profile image to your media library and use it as the profile picture.
This list will change over time as better and new plugins emerge. As a rule of thumb, you want to install quality plugins and watch for the following criteria when you pick a plugin:
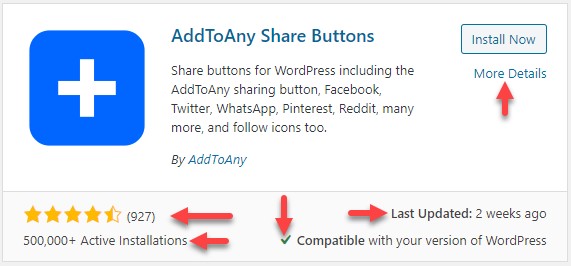
- Have been installed over thousands of sites
- The plugin is actively maintained, and check the last update was within the last few weeks.
- The plugin is compatible with your version of WordPress.
- Overall good reviews, and check out the reviews.
- Read the description, faq, and look at the screenshots to determine if the plugin meets your need.
10. Setup key pages for your blog
To make your website credible (and protect yourself), you must have a few important pages on your blog.
Home page: The home page will depend on your chosen WordPress theme. Typically this is configured within the theme itself, rather than a page you have to create manually.
About page: This page introduces you and your website to your audience. What makes you and your website unique? It’s an excellent place to share your story and connect with your audience. About page is typically the first page you will create.
Contact page: You may not want to reveal your address, phone number, or even email address. However, you should have a contact form for the user to reach out to you. Once the user completes the contact form and hits submit, you will get the email.

Ideally, you will want to hire a lawyer specializing in internet business to review and help you draft the document for Terms of Service, Privacy Policy, and possibly Affiliate Disclaimer as well. However, many of us don’t have thousands of dollars to hire a lawyer, and it doesn’t make economic sense when you are not making money yet.
Most blogs will be about sharing information and personal experience and promoting affiliations, so it does not carry much liability and risk. Of course, you know better about your niche. Keep in mind that I am not a lawyer and have no legal background. So please do your own due diligence.
Just to get started, there are free generator tools available that you can use to create those documents, and you can further customize them. One of the free generators available is Termly.io.
Privacy Policy: You need to tell people how you will collect and use the information from the users. It must meet provider requirements such as Amazon associate and local guidelines such as GDPR, CCPA, and CalOPPA.
Terms and Conditions: This document protects you and your business. You get to lay out the rule of what is acceptable and not acceptable, your liability, intellectual property rights, and much more.
Affiliate Disclaimer: You need to tell your users about your affiliate companies. Some merchants, such as Amazon, require Amazon Associates to disclose the relationship.
11. How to write a blog
Creating compelling content involves understanding your audience, conducting keyword research, and optimizing your posts for search engines. Utilize tools like Google Keyword Planner to identify relevant topics.
Additionally, focus on crafting engaging headlines, incorporating multimedia elements, and encouraging reader interaction through comments and social media sharing.
Step 1: Plan your writing
Identify the topic you want to write about and explore the keywords you may use in your writing.
Research and look at the top pages on Google search results using those keywords. If you need help with keyword research and content ideas, install the plugins and use the tools suggested to get blog post ideas.
While researching and planning your writing, think about how you can write differently, be unique, and improve.
BLOG TIP: Start with an end in mind. Imagine you will eventually publish a book on this niche. What topics and subtopics are you going to cover in this book?
Step 2: Outline your writing
To make the writing more effective, I prefer online the blog first writing a title, introduction, sub-topics to cover in the body of the article, and conclusion, along with a list of keywords I may want to target for the writing.
There are a few benefits to outlining your writing first:
- You have an overall picture and the flow of your writing.
- The outline will help you stay focused and stay on topic.
- You may experience writer’s block for a sub-topic. With the outline, you can jump around and write any sub-topic first.
- When you scale up, you can outsource your writing to freelancers. Freelancers will be more likely to deliver an article that meets your expectations.
Step 3: Write your blog post
With the keywords that you gathered, you want to use those keywords naturally in your writing and not try to stuff keywords in your writing. If you are not comfortable writing while referencing keywords, you can always write the article naturally first and come back to edit and optimize your article later.
BLOG TIP: Be true to yourself. If you enjoy writing in a conversational style, go for it. If you are humorous, feel free to inject jokes in your writing. If you are a serious person, so be it. Be unique and write it in your own style that others cannot replicate. You are best at being yourself.
Step 4: Edit your post
During the editing phase, you want to proofread your writing, tighten up all the loose ends, fix all the spelling and grammar mistakes. You will also want to include images and possibly screenshots, videos, or infographics, so your article is not just a boring article with blocks of words.
Here are my favorite free stock photo sites if you need images.
I also highly recommend three essential tools for editing and enriching my post – Grammarly, Canva, and Snagit.
Grammarly

Grammarly is a must-have tool for any content writer and blogger. You want your content error-free from basic spelling and grammatical mistakes that could turn away the readers and damage your credibility.
You can start with Grammarly for free and use it as a grammar and syntax checker.
The Premium version has all the basic functionalities and more powerful features, such as a Microsoft Word plugin, plagiarism checker, and the effectiveness of your writing.
It has been a tremendous time and money saver for me, so I can start blogging without paying a professional editor.
Canva
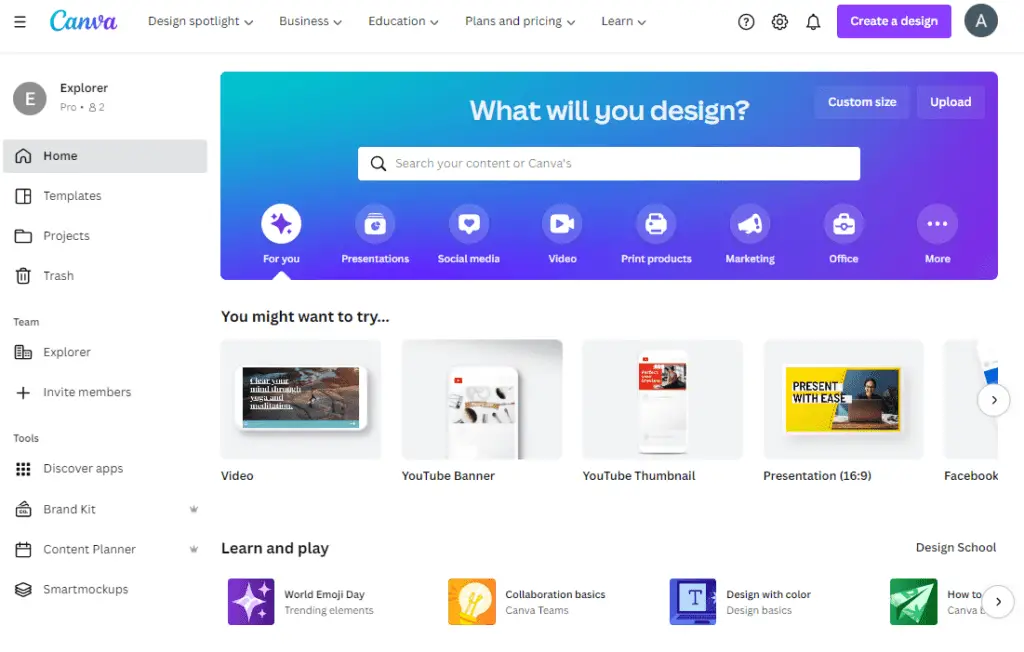
Canva is an online graphic editing tool that is simple for people who do not have a professional graphical design background. You can run it from any browser or mobile device with the Canva app.
Canva allows you to find and edit images to suit your blogging needs. You can find or upload a featured image for your blog and overlay it with text, icons, photos, and transparency. Templates, color palettes, and styles make creating a beautiful image easy and fun. Best of all, it’s free and has unlimited time.
Canva Pro is also affordable for less than $120/per year. It will give you access to over 100 million premium stock photos, videos, audio, and graphics. The pro version also gives you access to valuable tools such as brand kit, background remover, resizing, and teamwork with up to 5 users.
You can learn more about Canva with this Canva Review and find out if Canva Pro is worth it for you.
TechSmith Snagit

Image is a vital part of a blog and helps retain the reader’s interest. You will need to capture screenshots from time to time, especially if you are writing how-to blogs. Snagit from TechSmith is a convenient and easy screen capture tool to use.
It has many neat features such as blur, highlight, arrow, text, callout, shape, steps, cutout, magnify, crop, and more. You can also use the tool to capture video and make a small animated gif file. I used Snagit to capture and edit the screenshots shown on this blog.
AVOID: Do not plagiarize other people’s work. It applies to images as well. Don’t just grab an image from Google; you need to get specific consent from the creator. Stick with the royalty-free sites mentioned earlier.
Step 5: Optimize your post
SEO is a vast and exciting subject by itself. Here are just several easy optimization tips that you can implement for each of your blog posts.
Blog Title: Is your title compelling and includes the keyword? How is your title stacked up against the ones on the first page of Google?
Metadata: Metadata describes what your blog post is about. It should contain the long-tail keyword, a brief summary of your blog, and entice viewers to read your post. Think of this as a movie teaser.
Introduction: Try to include the keyword as you write the introduction; the keyword includes in the introductory paragraph carries a heavier weight.
Header (H2, H3): The header helps the reader and search engine understand the structure of your writing. The header is also a good place to reinforce your keyword if you can insert it naturally.
Category: Don’t leave your post in the “Uncategorized” category. Name categories that make sense for your niche and assign your post to the proper categories.
Link between your articles: If you have written related articles that your audience should read, include links to those articles in the new blog post. Likewise, go back to your old blog posts and link to the new blog if it is relevant. Internal linking will help search engines crawl your website and improve your ranking.

BLOG TIP: If you use the Rank Math plugin, the score indicates how well you did with on-page optimization. Try to at least score in the green zone.
Step 6: Publish your post
It is very satisfying to hit that publish button after all the hard work creating the blog. You can schedule your blog post if you have a content calendar and publishing schedule. The key is consistency.
12. Marketing your blog for free
Your work is not done after you published the blog. Having an amazing and optimized blog is only part of the equation. To make your blog successful and rank higher (and faster) on Google, you will need to market and promote your blog.
Don’t worry. You do not need to spend any money on marketing. Here are a few ideas where you can promote your blog for free and easily:
- Tell your family and friends.
- Leverage social media platforms such as Twitter, Facebook, Pinterest, etc.
- Participate in discussion groups such as Quota, Reddit.
- Send an email to your mailing list (if you have subscribers).
- Participate in forums within your niche. If you have been adding value, providing advice, and becoming a trustworthy member, the moderator may allow you to add a link to your website.
As a new blog site, it can take more than 6 months to gradually move your article up the ranking position. The speed will depend on the competitiveness of your niche and keywords. So you need to have patience.
13. Maintaining your blog
Congratulations on creating the blog. To run a blog successfully, you will need to maintain and continue improving your website. You will continue to publish content and deal with any technical issues that you will come across.
Integrate with Google Search Console and Google Analytics
If you have not done so already, you must integrate your website with Google Search Console and Google Analytics.
You will need to submit your sitemap (created by Rank Math or Yoast SEO) to Google Search Console, which will help Google crawl your website. You can also use Google Search Console to monitor any problems with your website and monitor your progress over time.
Google Analytics helps you understand your visitors and how they interact with your website. You will have a better idea of what device they use, demographic information, page visits, and much more.
Publish regularly to keep existing blogs relevant
It is essential to publish blog posts regularly if you want to rank well on Google. Publish a new article more than once a week, if possible. If not, you should strive to publish at least once a month.
You should also revisit the existing blog posts and polish those by linking to the new post and keeping the old posts relevant. If there are posts that are not relevant anymore, delete them, and make sure you redirect the URL to a valid page.
BLOG TIP: You can use Google Search Console and look for the keywords for which the existing page has been ranked but isn’t ranking well. Use those keywords as guidance and try to augment your existing post with those keywords.
If this seems overwhelming and a lot to do, you don’t need to do this all by yourself. I have used Fiverr on multiple occasions, including webmasters, graphic designers, content writers, and virtual assistants. Fiverr is a great place to start if you need help with your blog at an affordable price. Here are tips for hiring on Fiverr.
Backup your site
You should back up your website regularly. The frequency will depend on how often you publish blogs and update plugins. You will also have peace of mind in case your website is hacked. You can use a WordPress plugin such as UpdraftPlus.
Ready to become a successful blogger?
If you want to become a successful blogger, there is a lot to learn along the way, and you will need to buckle up and enjoy the journey.
I provided many tips on how to start a blog, which can be a bit overwhelming for starters. Bookmark this page and review the steps and tips as you go through the process. I hope these tips will help you save some money while avoiding costly mistakes.
Once your blog is up and running, you may want to explore how to make passive income with your blog.
Finally, we look forward to hearing your success story in the comment below and seeing you on the first page of Google.

